How to field-strip a Ruger MK pistol - an annotated manual
A few years ago I got a heavy barrel target version of Ruger MKIII at Cabela's. I loved the pistol. It came with fully adjustable sights and scope mount - and
the iron sights even worked when the scope mounting bracket was installed. It was supremely accurate, predictably putting 10 shots in 1" diameter circle at 25 yards.
It had a nice trigger. It felt good - substantial, but not overly heavy - in my hand.
The love affair was put on hold the first time I tried to disassemble it. Well, the disassembly itself was easy - the problems started when I tried to put it
back together. For the next 2 hours I cursed Ruger engineers, scoured the internet for instructions, and peered hopelessly into the manual.
Unfortunately, everything worked great on videos, and the manual was very clear, but MY parts positively refused to fit together. Until I finally gave up
on videos and the manual and tried to understand how this thing REALLY works. And after that everything snapped together easily.
So for a while I nourished the idea to post a tutorial on how to field strip and - most importantly - reassemble my Ruger pistol. The final impetus came when
I got my hands on a Ruger 22/45 "Lite" and decided to review it. And what good would the review be if it did not address the main problem with these pistols - namely,
the disassembly.
Please note that these instructions are not intended as a replacement for the manual, which, by the way, is available here: http://www.ruger.com/products/_manuals/markIII.pdf
I quote it mostly by providing the anchor points for my annotations. Please, do read the manual in its entirety and follow it carefully!
Disassembly
MANUAL: 1. Before beginning disassembly, be certain that the muzzle is pointed in a safe
direction and that the safety is "on" (S) if the pistol is cocked. Remove the
magazine and carefully check it to verify that it is completely empty. Draw
the bolt fully rearward and visually inspect the chamber to be certain that
there is no cartridge in it and then release the bolt. Insert the empty
magazine into the magazine well until it "clicks" and is fully in place.
Disengage the internal lock, if necessary. (See p. 13.) Place the safety in the
"off" (F) position. Point the pistol in a safe direction and pull the trigger to
be sure the hammer has fallen. The hammer must be uncocked before the
pistol can be disassembled. Remove the empty magazine.
ME: This last part about dry-firing the pistol is really important - if you don't do it, the next step will fail!
MANUAL: 2. Insert a blunt, ‘pointed’ instrument in the oval recess of the mainspring
housing (at the back of the grip) and swing the housing latch open like the
blade of a pocket knife. (Some users find that a paper clip, looped over the
latch, is an ideal ‘instrument’ for this phase of disassembly.)
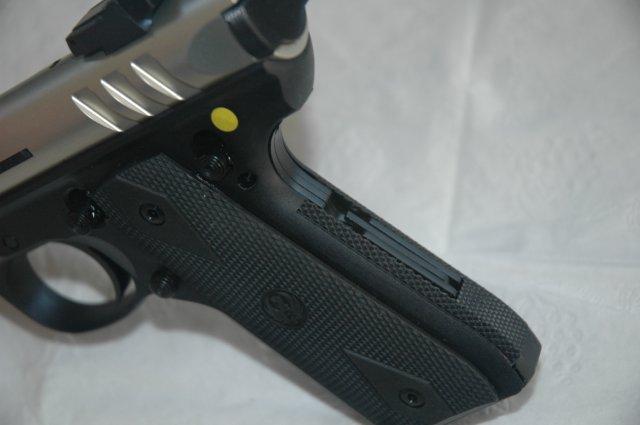
ME: I just use a screwdriver. So far it does not seem to have marred anything.
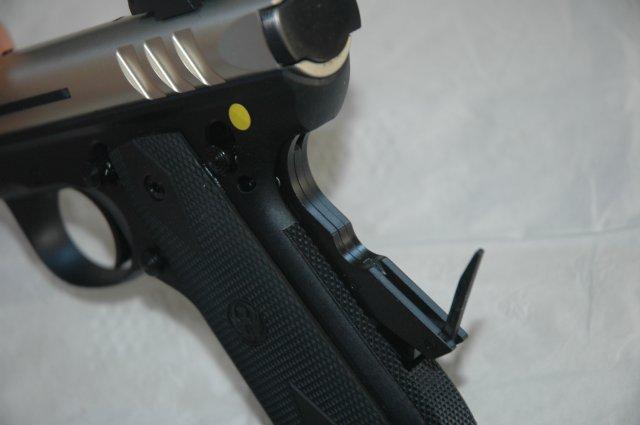
MANUAL: 3. Swing the entire housing outward on its pivot and pull downward, removing
the mainspring housing and bolt stop pin. With new pistols it may be
necessary to lightly tap (with a plastic hammer and wooden dowel) on the
top portion of the bolt stop pin—which protrudes above the receiver—while
pulling downward on the mainspring housing. Be careful not to damage the
rear sight.
ME: I found that just wiggling the mainspring out by turning it slightly back and forth and pushing it down works fine,
but tapping it out with an appropriately sized wooden dowel works great, too (I bought a bunch of them, different diameters,
at Home Depot once, and pieces of them have proven to be invaluable in all kinds of firearms projects).
MANUAL: 4. Fully insert the empty magazine into the frame. Point the muzzle upward in
a safe direction and pull the trigger rearward. The bolt will drop out of the
receiver or it can readily be removed. Remove the magazine.
ME: What this acrobatics actually does is having the hammer drop down and get out of the bolt's way. On my pistol
it wouldn't do it on its own, so the bolt wouldn't come out. I used magnetic screwdriver to pull the hammer down instead.
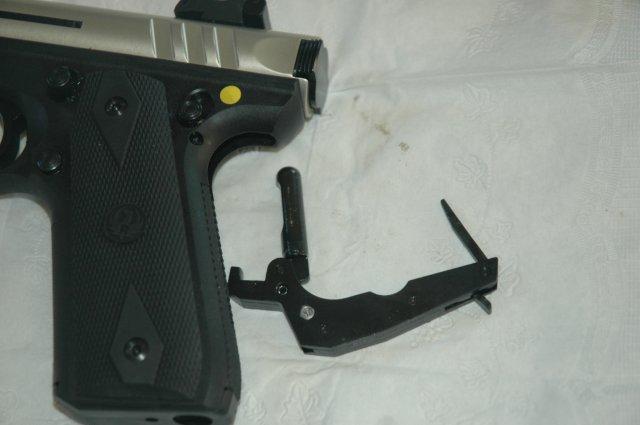
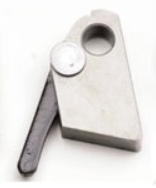
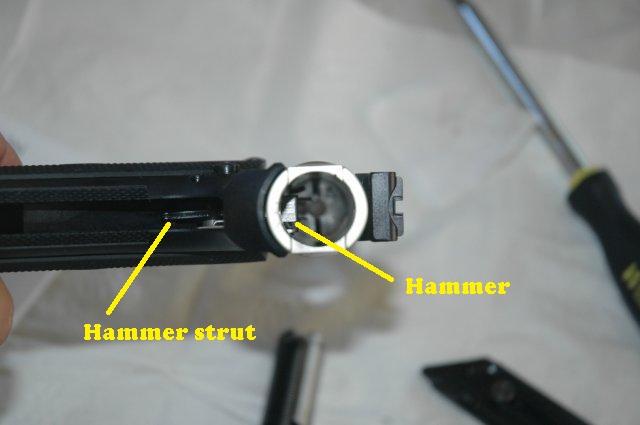
NOTE: Hammer is a white piece of metal that you can see through the opening left by the mainspring. It has a little
black thingy (AKA hammer strut) hanging off of it (which will be crucially important for reassembly), and looks like
this when removed:
Here you can see the hammer strut looking through the opening left by the mainspring, and the hammer itself is the flat
piece visible through the receiver opening where bolt was.
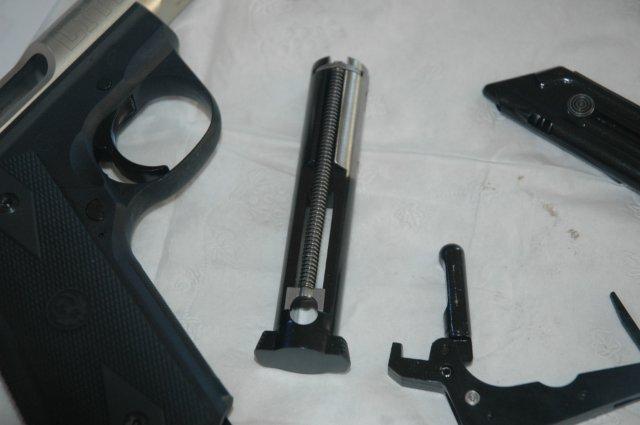
Here it is again. Remember this component, it is CRUCIAL for reassembly!

...and here are all the pieces...
MANUAL 5. With the mainspring housing, bolt stop pin, (as an assembly), bolt and
magazine removed, a forward blow (with a plastic hammer) on the rear of
the receiver will disengage the barrel-receiver assembly from the grip frame.
No attempt should be made to remove rivets or staked pins. Further
disassembly should be undertaken only by the factory.
ME: If you really insist. In actual fact, this step does not make it any easier to clean the gun, so I usually skip it.
...so this was really, really easy. Now on to the hard part.
Reassembly
MANUAL: 1. Be certain the pistol is free of cartridges! The safety must be
in the "off" (F) position for reassembly.
ME: The first part of this is idiotic. How would cartridges make it into a disassembled pistol??? And that, unfortunately,
makes it easy to overlook the crucial part - if the safety is not in "F", the hammer won't turn in step 4, and the hammer
strut won't move into the right position on the mainspring housing!
MANUAL: 2. Keep your finger off the trigger. Place the hammer in the horizontal (cocked) position.
MANUAL: If you cannot place the hammer in the horizontal
position, it is most likely because the hammer strut is
trapped behind the crosspin (see Figure 7 – not
applicable to 22/45 models). If this occurs, lift the
hammer to free the hammer strut from behind the
crosspin and then move the hammer into the
horizontal position.
MANUAL: If the hammer has been rotated too far forward, it also
may be difficult to rotate backwards. Inserting the
empty magazine fully into the magazine well will allow
the hammer to rotate backwards into a horizontal
position. Once the hammer is horizontal, remove the
empty magazine.
MANUAL: Before placing the barrel receiver onto the frame,
make sure that the loaded chamber indicator pin (Part
No. A02611 / Key No. 7 in the exploded view drawing
on p. 39) has not fallen out of the receiver.
MANUAL: 3. Place the barrel receiver on top of the
frame so that the square lug engages the
square front recess on the underside of
the receiver (see Figure 8A). Push the
barrel rearward until it stops, with the
rear end of the receiver slightly overhanging
the rear end of the grip frame
(see Figure 8B). If alignment cannot be
achieved by hand pressure, place the
pistol (muzzle down) on a padded bench
and strike the rear of the grip frame
immediately below the receiver with a
plastic or wooden mallet. Be careful not
to damage the grip frame.
ME: This "striking" part is the reason I never take the receiver off the frame.
It achieves nothing, and if you are unlucky you can really break something...
MANUAL: 4. Fully insert the empty magazine back into
the magazine well. Point the muzzle up in a
safe direction and pull the trigger. Gravity
should cause the hammer to return to the
cocked position if it became dislodged in step
3 (see Figure 9). If not, reach into the rear of
the receiver and push the hammer back down
flat (into the horizontal position). When the
hammer is in this position, remove the empty
magazine.
ME: In my two pistols gravity never work. Just level it out by hand. If it does not turn, you forgot to put safety on "F"!
Again, pay attention to the strut. It can be lodged behind the cross pin preventing the hammer to go all the way down. Wiggle it out.
MANUAL: 5. NOTE: Before sliding the
bolt into the receiver, BE
CERTAIN that the firing pin
stop (part number A03500, a
small pin) is in the bolt. (See
Figure 10.) Without this pin,
the first time the trigger is
pulled on an assembled
pistol, the firing pin will fly
forward so far as to
irreparably dent the rear end
of the chamber of the barrel, making the pistol useless. Now, slide the bolt (with
the recoil spring upward) fully forward into the receiver.
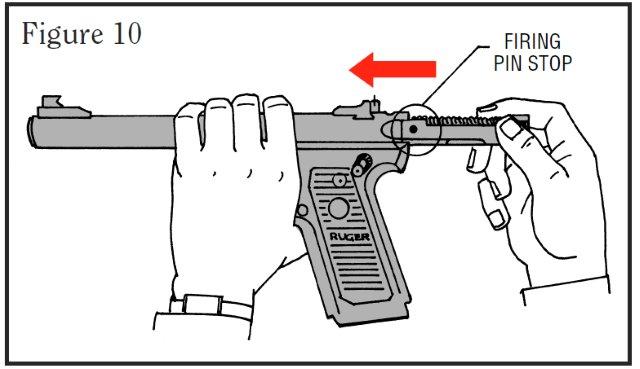
ME: Failure to pay attention here can ruin your pistol!
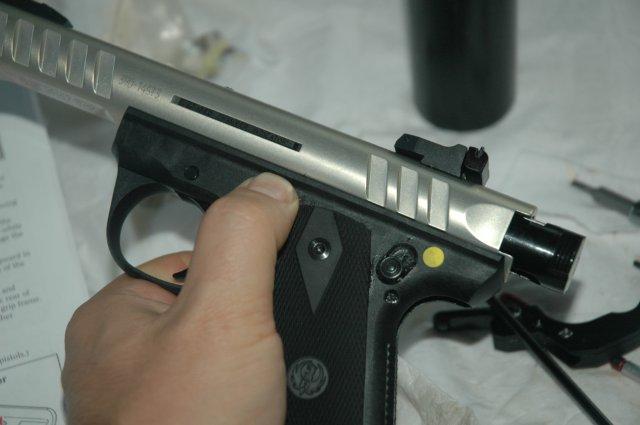
ME: The bolt is in!
MANUAL: 6. Insert the empty magazine into the
magazine well, point the muzzle toward the
ground in a safe direction and pull the trigger.
The hammer should fall to its full forward
position. If it does not, retract the bolt
partially and manipulate the hammer through
the slot in the rear of the frame until the
hammer is in its full forward position.
ME: It won't (gravity does not work here, unless it's a fully polished factory sample), and don't bother with retracting the bolt.
Instead use a pen or a screwdriver to simply push the hammer forward. Pay attention to the magazine: it should be in at this point,
or else nothing will work!
MANUAL: Point the muzzle toward the ground. With the
pistol in this position, hold the mainspring
housing bolt stop pin assembly and press the
bolt stop pin through the holes in the receiver
and bolt until the tip of the pin protrudes
beyond the top of the receiver. (See Figure
11.) You may need to tap the mainspring
housing into position with a rubber or wooden
mallet. The pin must be fully in place to close
the latch in Step 8. Do not yet move the
mainspring housing into the frame.
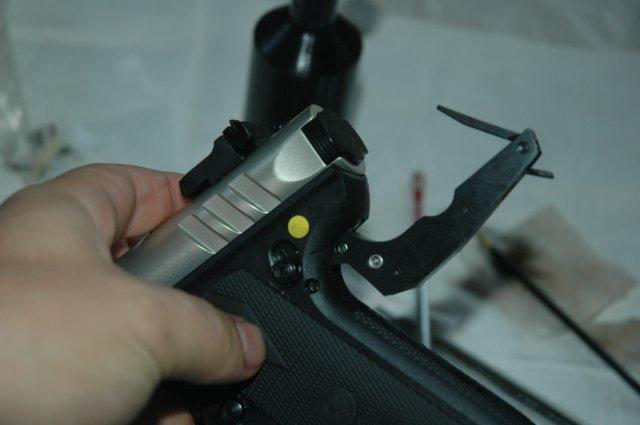
ME: You should not tap anything - just squeeze it until it clicks. Do pay attention - the holes on either side of he receiver should be
generally, although not exactly - aligned with the cutout on the bolt. That "not exactly" aligned part is going to click in place once you push
on the bolt stop. This is how it's going to look at this point:
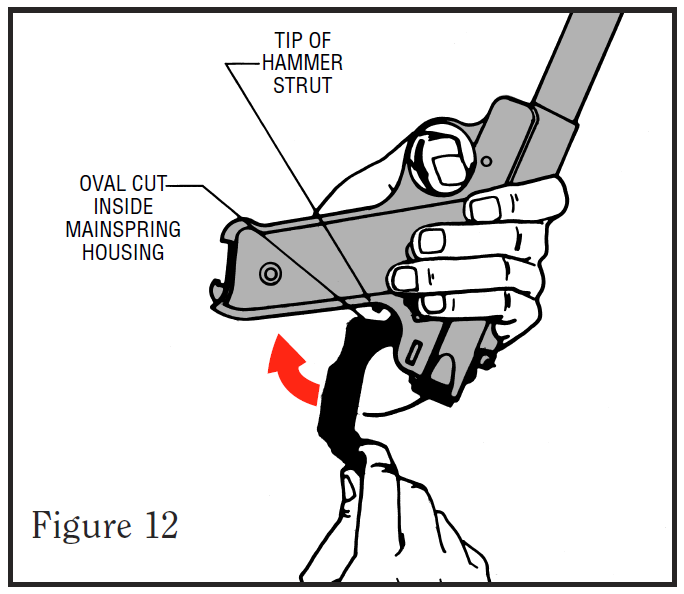
MANUAL: 7. (For 22/45 models, skip to 7A.)
Now invert the pistol so that the
muzzle is pointed upward. Make
sure you can see the hammer strut
when you lift the housing up. The
hammer strut should go into the
oval-shaped cut inside the
mainspring housing. (See Figure
12.) Hold the trigger to the rear.
MANUAL: While holding the pistol in this position
and depressing the trigger, move the
mainspring housing into its proper place
in the frame.
ME: Note that the picture in the manual is incorrect - it is CRUCIALLY important that the magazine is in. If it's not in at this point, you will
be able to insert the mainspring and even close it - but when you try to pull back the bolt, it will get stopped about 1/2 out.
MANUAL: 7A. For 22/45 models ONLY: Now invert
the pistol so that the muzzle is pointed
upward. Make sure you can see the
hammer strut when you lift the housing
up. The hammer strut should go into the
oval-shaped cutout inside the mainspring
housing (see Figure 12). While holding the
pistol in this position and depressing the
trigger, close the mainspring housing as
far as it will go without excessive pressure. Holding the mainspring housing in
this position, release the trigger and remove the magazine. Once the magazine is
removed, the mainspring housing will close the rest of the way.
ME: Note that the picture in the manual is incorrect - it is CRUCIALLY important that the magazine is in. If it's not in at this point, you will
be able to insert the mainspring and even close it - but when you try to pull back the bolt, it will get stopped about 1/2 out.
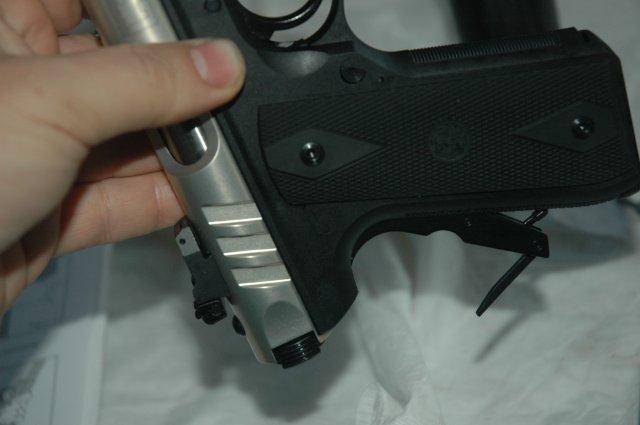
MANUAL: 8. The housing latch can now be snapped shut,
completing assembly. (See Figure 14.) Spring
pressure should be felt just before the housing is
fully shut if the internal parts are correctly
aligned.
MANUAL: 9. To determine if reassembly was performed
correctly, pull the bolt backward and verify that
it opens fully. If not, open the latch and repeat
steps 6 - 8, above.
ME: If the bolt does not open, you neglected to have the magazine in during 7 or 7A.
MANUAL: 10. Replace empty magazine, point pistol in a
safe direction and pull the trigger to uncock the gun. Guns should not be stored
loaded or cocked. Note that in order for the internal lock to be engaged, the pistol
must remain cocked, and the manual safety must be put “on” safe. (See p. 12.)
ME: ...and, we're done! Note that this says - explicitly - that Ruger MK pistols are safe to dry fire. Yay!